Simplify Your Rocket R60V
Espresso Profiler Makes Coffee Easy
the app License Agreement]
You picked the Rocket R60V to let you customize coffee.
With Espresso Profiler, it's easy to tailor extractions.
Perfecting espresso is easy:
● Enter time and pressure for your profile steps
● Click 'Save'
● You're done.
Experiment with your favourite beans and find the perfect shot.
Add Espresso Profiler to your laptop or desktop,
connect through wi-fi, then tweak your machine.
Yup! Put your credit card away.
Espresso Profiler is completely free for its introductory year.
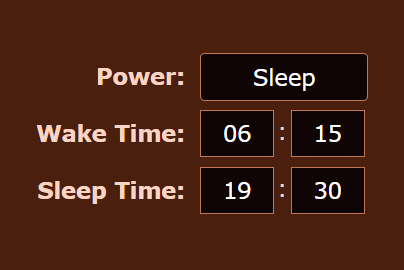
Set a sleep schedule that works for you.
Brew espresso the moment you wake.
Snooze when you're done for the day.
Return your machine to sleek perfection.
Lock that bulky control box away!
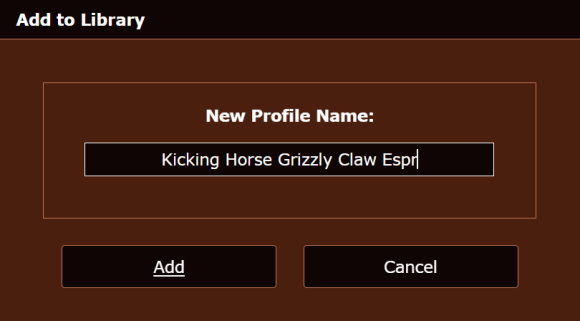
Build a Coffee Profile Library
No!
Espresso Profiler is not in any way affiliated with, endorsed or acknowledged
by Rocket Espresso Limited.
Rocket and Rocket R60V are registered trademarks of Rocket Espresso Limited.
Me!
My name is Charles O'Dale. You can find my blog here.
For now, this app only supports the Rocket R60V.
If you would like me to link to a different espresso machine, please do get in touch!
Each Espresso Profiler button and label has pop-up help text.
Hover your mouse over any option to get more detail.
You can also find step-by-step instructions further down this page.
It did, but Mac OS X turned out to be a nightmare.
Older Macs would connect to the Rocket R60V wi-fi channel, but do not allow the app to run (thank Apple's code signing security rules for that).
Newer Macs would run the app, but only connect to the Rocket R60V wi-fi channel after expending great effort (you can read about that here).
If you would find an Espresso Profiler app for Mac OS X helpful, please ask Rocket to get in touch with me. I would be delighted to help make this an official Rocket app!
Yes. Espresso Profiler is free for its introductory year (until 2027).
The app will stop working after its free year is complete.
You will be able to update to the final app version at that time.
All saved profiles and settings will move to your updated app.
If you want.
You can uninstall Espresso Profiler at any time if the free app
delivered all that you wanted.
If you find this app helpful, I hope you'll consider making a
purchase when that option becomes available.
I love my Rocket R60V espresso machine. But I thought its
adjustment options could be better.
To fix that, I created this R60V app for my 2024 summer project.
Check below!
You'll find step-by-step instructions for most things you'll want to do.
I'd love to!
Just send me an email and I'll see what can be done.
They almost certainly are!
The in-app translations for German, French and Italian-language screens
were my best attempt at matching the language on the R60V.
But that's going to be wrong in spots.
If you spot a language translation fix, please send it to me
and I'll correct it in the next update.
Email is best.
Please send any questions you might have to support@espressoprofiler.com
When you start Espresso Profiler, you will see a Link screen.
Follow the instructions on that screen to connect.
The basics are:
● Connect your computer's wi-fi to the 'RocketEspresso' network
● Click the green 'Connect to R60V' button
After your R60V is linked, the Espresso Profiler main screen will open.
Don't forget: Wi-fi uses one channel at a time.
If you use wi-fi to connect to the internet, select your usual internet wi-fi network
when you are done using Espresso Profiler.
If Espresso Profile linked to your R60V with the steps above, you're good to go.
If Espresso Profiler stated:
'Your computer could not connect to your Rocket R60V.'
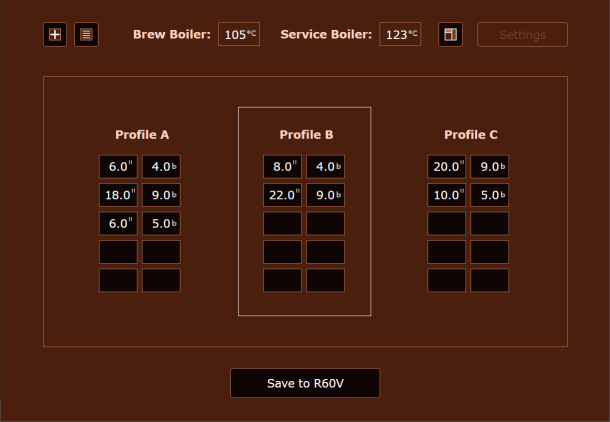
Your R60V's A, B, and C profiles are shown on your main screen.
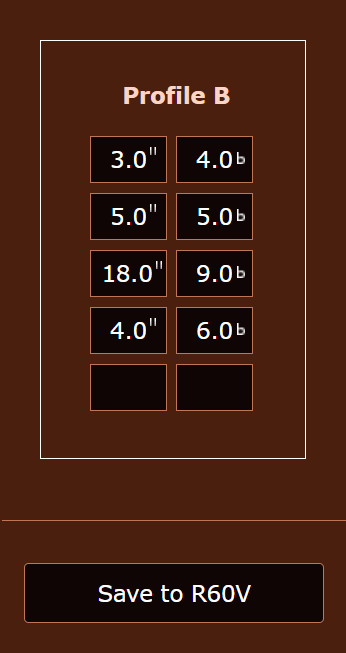
To change one of those profiles, enter your new values for time and pressure,
then click the 'Save to R60V' button.
Your changes will be saved on your R60V.
That's it!
When you see the 'Saved' confirmation, you can run your R60V
to brew with that new profile.
Click one of the A, B, or C profiles shown on your main screen.
Your selected profile will have a border outline.
After you have selected a profile, click the 'Save to R60V' button.
When you see the 'Saved' confirmation, your R60V will be set
to use that profile on its next brew.
Select the profile A, B, or C you want to save.
Click the 'Add Profile' button; your add profile dialog will appear.
Enter the name you would like to use for your profile.
Click the 'Add' button.
When you see the 'Added' confirmation, your profile has been saved.
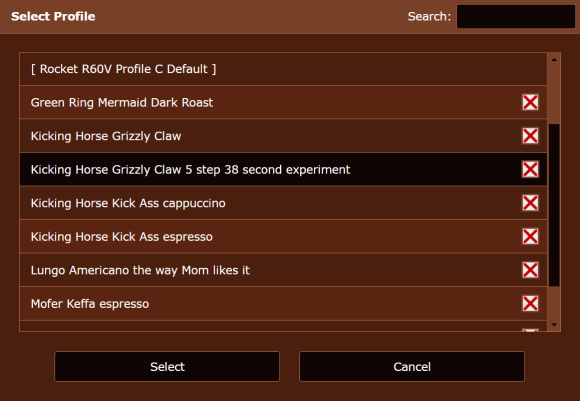
Select the profile A, B, or C you would like to load your saved profile to.
Click the 'Select Profile' button; your selection list will appear.
Four default profiles are set at the top of your selection list:
● Blank Profile
● Rocket R60V Profile [A B C] Default
Those options allow you to clear your selected profile,
or start with one of the Rocket default options.
Any profiles you add to your library will be listed beneath those options.
Scroll through the available options, and double-click the profile
you would like to use.
You will be returned to your app main screen, with your profile A, B, or C
set to your selected settings.
Click the 'Save to R60V' button.
When you see the 'Saved' confirmation, your R60V will be set to use that profile.
To rename, resave!
Follow the usual steps to select your profile, then add it to your library under a different name.
Your old profile can be deleted by clicking the red 'X' in your selection list.
Click the 'Settings' button; your Settings screen will open.
Click the 'Set R60V Clock' button; click 'Yes' on the confirmation message.
When you see the 'Saved' confirmation, your Rocket R60V's internal clock
will be set to match your computer's time.
Please note: if your region has annual 'Daylight Savings Time' hour changes,
you might need to reset your R60V clock on those days.
Click the 'Settings' button; your Settings screen will open.
In the 'Wake Time' fields, enter the hour (24-hour clock)
and minute at which you like your R60V to wake for the day.
Click the 'Save to R60V' button.
When you see the 'Saved' confirmation, your R60V will
automatically wake at the hour/minute you have set.
Please note: to ensure your R60V's internal clock matches your time zone,
please click the 'Set R60V Clock' button the first time you set a wake schedule.
Click the 'Settings' button; your Settings screen will open.
Toggle the Power button from 'Active' to 'Sleep'.
Click the 'Save to R60V' button.
When you see the 'Saved' confirmation, your R60V will be asleep.
Click the 'Settings' button; your Settings screen will open.
Click the 'Reset All' button; a confirmation message will appear.
To complete your reset, click 'Yes' to confirm.
After your reset is complete, you will be prompted to restart your app.
Please note: a reset of your Rocket R60V settings will not touch your library of saved profiles,
or your reservoir/plumbing water source selection.
Espresso Profiler is not in any way affiliated with, endorsed or acknowledged by Rocket Espresso Limited.